RTM Racing Manual Boost Controller
Installation Instructions
NOTE: IF YOU DO NOT HAVE A RELIABLE AFTERMARKET BOOST GAUGE, STOP!!! We DO NOT recommend installing this boost controller without some way of telling how much boost you are running!! Stock boost gauges are notoriously inaccurate and unreliable.
NOTE: Do not block the vent hole in the body of the MBC. Blocking this hole can cause the wastegate to lock up.
INSTALLATION
Remove the Stock System:
Unplug the BCS (Boost Control Solenoid), remove the hoses that attach to it and either completely remove them or cap them off. The BCS system will not be used with this boost controller.
Choosing a Pressure Source:
There are a variety of pressure sources that can be used. There really is no one “correct” boost source. Arguments both for and against various pressure sources have been put forth. We’ll let you decide on which to use. If in doubt, we recommend experimenting with the various sources and deciding which one best suits your application.
Here are the various boost sources we recommend:
Intake Manifold: you can source from a nipple on the intake manifold itself or most people simply tee into the vacuum line going to the BOV. The main advantage of using this source is that it’s closest to the boost value your engine sees.
Nipple on Turbo Outlet: many choose a pressure source as close to the turbo outlet as possible. Some turbos have a nipple on the outlet itself, others have a nipple on the piping just after the turbo, etc. The main advantage of using this source is that it’s the truest boost value actually produced by the turbo (as opposed to a value downstream of the turbo which is subject to pressure drops, etc)
Intercooler Piping: some choose a pressure source somewhere between the intake mani and the turbo outlet (usually somewhere in the intercooler piping). This source is a sort of compromise between the two other sources above.
Connecting to the MBC:
Connect the source line (from one of the sources chosen above) to the inlet port of the MBC. The inlet port is the fitting directly opposite the adjustment screw.
Connect the outlet port on the MBC to the wastegate actuator. This is the port pointing out perpendicular to the inlet port / adjustment screw (and directly opposite the vent hole in the MBC body).
Try to minimize the length of all hoses and make sure they’re zip tied out of the way of moving / hot parts. Mount the MBC securely (with zip ties, etc) and make sure all hose connections are tight (we recommend using small zip ties to clamp the hose to the various ports). Make sure not to block the vent hole in the body of the MBC.
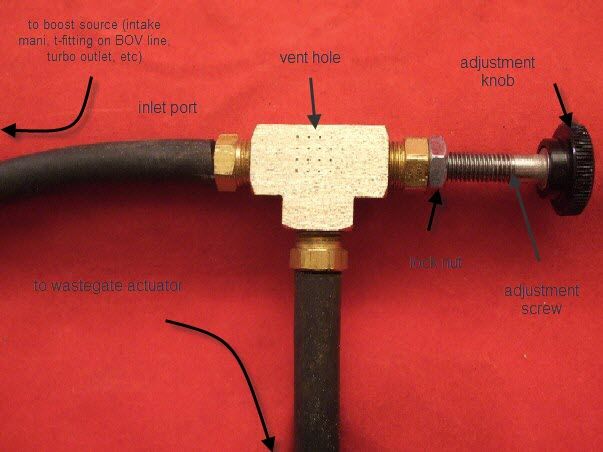
Figure 1.
Adjusting the MBC:
MBC’s are shipped set to the minimum boost. However, it is always best to confirm this. Minimum pressure is with the adjustment screw turned (counter-clockwise) all the way out. There is a stopper inside the MBC that prevents the screw from coming all the way out, but when resistance is felt, the screw is backed off all the way. At this point, tighten the lock nut against the body of the MBC (this prevents the adjustment screw from moving from vibration, etc).
Test runs should be made with the engine under load. We recommend 3rd, 4th or 5th gears runs as these gears tend to give the most reliable boost readings.
During the initial setup stage, turn the adjustment knob no more than half a turn every time you change the boost setting. Make sure that the lock nut is tight after each adjustment or inadvertent boost changes can occur, leading to possible engine damage.
Boost levels are set by rotating the adjustment knob either clockwise (more boost) or counter-clockwise (less boost).
Once the boost setting is close to the desired level, turn the adjustment knob in quarter-turn increments and remember to tighten the lock nut with each setting.
Once a desired boost setting has been established, make sure to check all your hose connections again for tightness, no binds, etc. It’s best to go on several test runs at the “final” boost level to confirm that it holds steady. If not, check for leaks in the hoses, confirm the lock nut is tight, etc.
Make sure the boost level set is within the mechanical limits of the vehicle components.
Increased boost levels often lead to lean conditions. We recommend the following at the time of installation: replace the fuel filter and inspect the fuel system.
DISLAIMER:
INCREASING BOOST LEVELS IS A PRACTICE THAT IS NOT ADVISED BY ORIGINAL EQUIPMENT AUTOMOBILE MANUFACTURERS. WHILE DOING SO WILL LEAD TO MORE POWER OUTPUT, IT CAN VERY WELL LEAD TO ENGINE DAMAGE OR COMPLETE ENGINE FAILURE IF DONE IMPROPERLY. THE ADDITION OF MORE POWER TO ANY VEHICLE REQUIRES DUE CAUTION WHILE THE DRIVER BECOMES ACCLIMATED. RTM RACING IS NOT LIABLE FOR ANY DAMAGE OR INJURY THAT MAY ARISE FROM USE OF THIS DEVICE
RTM Racing MBC (Manual Boost Controller)
Categories
- New at RTM Racing
-
MITSUBISHI / EAGLE
- Eclipse / Talon / Laser
-
DSM: 1g (1990-94)
- Maintenance
- OEM Hardware
- Body & Exterior
-
Brakes
- Brake Upgrades
- Calipers
- Lines
- Rotors
- Pads
- Master Cylinder, Brake Booster, Proportioning Valve
- Parking Brake Cables, Hardware, etc
- Cooling
- Drivetrain & Transmission
- Engine
- Engine Management
- Exhaust
- Fuel
- Gauges
- Ignition & Electrical
- Intake
- Intercooler
- Interior
- Meth/Water Injection
- Suspension & Steering
- Turbo
- Wheels
- Safety
- Special Tools
-
DSM: 2g (1995-99)
- Maintenance
- OEM Hardware
- Body & Exterior
-
Brakes
-
Brake Upgrades
- 3000GT-VR4/Cobra Front Big Brake Upgrade
- 3000GT-VR4/Genesis Front Big Brake Upgrade
- Wilwood Front Big Brake Upgrade
- EVO 5-9 (Brembo) Front Big Brake Upgrade
- CTS-V (Brembo) Front Big Brake Upgrade
- Ford Cobra Front Big Brake Upgrade
- Outlander Front Big Brake Upgrade
- EVO 5-9 (Brembo) Rear Big Brake Upgrade
- Calipers
- Lines
- Rotors
- Pads/Shoes
- Master Cylinder, Brake Booster, Proportioning Valve
- Parking Brake Cables, Hardware, etc
- Brake Fluids
-
Brake Upgrades
- Cooling
- Drivetrain & Transmission
- Engine
- Engine Management
- Exhaust
- Fuel
- Gauges
- Ignition & Electrical
- Intake
- Intercooler
- Interior
- Meth/Water Injection
- Suspension & Steering
- Turbo
- Wheels
- Safety
- Special Tools
- Penetrants, Anit-Seize, Rust Removal
- DSM: 2gNT (1995-99)
-
EVO: I-III (1992-96)
- Maintenance
- OEM Hardware
- Body / Exterior
- Brakes
- Cooling
- Drivetrain & Transmission
- Engine
- Engine Management
- Exhaust
- Fuel
- Gauges
- Ignition & Electrical
- Intake
- Intercooler
- Interior
- Meth/Water Injection
- Suspension & Steering
- Turbo
- Wheels
- Safety
- Special Tools
- Penetrants, Anit-Seize, Rust Removal
-
EVO: IV-VI (1996-01)
- Maintenance
- OEM Hardware
- Body / Exterior
- Brakes
- Cooling
- Drivetrain & Transmission
- Engine
- Engine Management
- Exhaust
- Fuel
- Gauges
- Ignition & Electrical
- Intake
- Intercooler
- Interior
- Meth/Water Injection
- Suspension & Steering
- Turbo
- Wheels
- Safety
- Special Tools
- Penetrants, Anit-Seize, Rust Removal
-
EVO: VII-IX (2001-07)
- Maintenance
- Body / Exterior
- Brakes
- Cooling
- Drivetrain & Transmission
- Engine
- Engine Management
- Exhaust
- Fuel
- Gauges
- Ignition & Electrical
- Intake
- Intercooler
- Interior
- Meth/Water Injection
- Suspension & Steering
- Turbo
- Wheels
- Safety
- Special Tools
- Penetrants, Anit-Seize, Rust Removal
-
EVO: X (2008-15)
- Maintenance
- OEM Hardware
- Body & Exterior
- Brakes
- Cooling
- Drivetrain & Transmission
- Engine
- Engine Management
- Exhaust
- Fuel
- Gauges
- Ignition & Electrical
- Intake
- Intercooler
- Interior
- Meth/Water Injection
- Suspension & Steering
- Turbo
- Wheels
- Safety
- Special Tools
- Penetrants, Anit-Seize, Rust Removal
- Galant VR4 (1988-97)
- 3000GT (1991-99)
- Lancer / Ralliart
- OEM Hardware
-
Universal
- Air Filters
- Anti-Seize
- Banjo Bolts & Fittings
- Batteries & Battery Boxes
- Blowoff Valves
- Body Accessories
- Boost Controllers
- Brake Accessories
- Catch Cans
- Couplers
- CV Boot Clamps
- Engine Bay Grounding Kits
- Engine Management
- Exhaust
- Fire Extinguishers
- Fluids
- Fuel
- Fuses
- Gauges
- Heat Shields, Wraps, Coatings
- Hood Pins & Latches
- Hose
- Hose Clamps
- Hose Ends & Fittings
- Intercooler
- Interior Accessories
- Magnetic Oil Drain Plugs
- Meth/Water Injection
- Oil & Transmission Coolers
- Penetrants
- Plumbing
- Racing Seats
- Rad Fans, Rad Caps, Accessories
- Rust Removal
- Scan Tools (OBDII)
- Shift Knobs
- Silicone Couplers
- Surge Tanks
- T-Bolt Clamps
- Throttle Bodies
- Turbo
- Turbo Timers
- V-Band Clamps
- Vacuum Hose
- Wastegates
- Weld Bungs
- Wheel Accessories
- Wideband O2
- Window Stickers
- Windshield Wipers
- Y-Blocks
- Hard-to-Find Parts
- Bargain Bin
- Made by RTM
- Search don't Surf
Cart is empty
Manufacturers

Users online:
412
anonymous customer(s)
Powered by X-Cart shopping cart software
Copyright © 2003-2024 RTM Racing